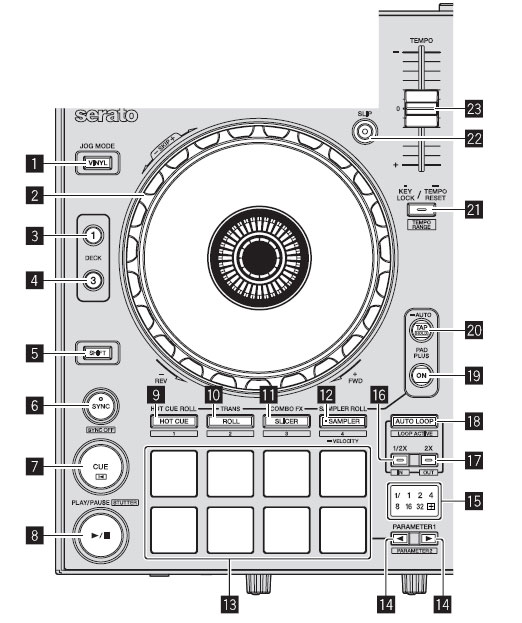
1. VINYL button
This switches the vinyl mode on/off.
2. Jog dial
Turn top:
When the vinyl mode is on, the scratch operation is possible.
When the vinyl mode is off, the pitch bend operation (adjustment of the playing speed) is possible.
Turn outer section:
The pitch bend operation (adjustment of the playing speed) is possible.
[SHIFT] + Turn top:
The playback position skips in sync with the beat. (Skip mode)
- The skip mode cannot be used with tracks for which no beatgrid is set. For details on setting beatgrids, see the Serato DJ software manual.
- To use the skip mode, [SYNC PREFERENCE] in the Serato DJ [SETUP] menu must be switched to [Smart sync].
3. DECK 1 button
The deck on the right side has a [DECK 2] button. Switches the deck to be operated.
4. DECK 3 button
The deck on the right side has a [DECK 4] button. Switches the deck to be operated.
5. SHIFT button
When another button is pressed while pressing the [SHIFT] button, a different function is called out.
6. SYNC button
Press:
The tempos (pitches) and beat grids of tracks on multiple decks can be synchronized automatically.
[SHIFT] + press:
Cancels the sync mode.
7. CUE button
Press:
This is used to set, play and call out temporary cue points.
- When the [CUE] button is pressed while pausing, the temporary cue point is set.
- When the [CUE] button is pressed during playback, the track returns to the temporary cue point and pauses. (Back Cue)
- When the [CUE] button is pressed and held after the track returns to the temporary cue point, playback continues as long as the button is pressed in. (Cue Sampler)
- When the [PLAY/PAUSE 15] button is pressed during cue sampling, playback continues from that point.
[SHIFT] + press:
Loads the previous track in the track list. (Previous Track)
- If the current playback position is not the beginning of a track, the track returns to the beginning.
8. PLAY/PAUSE 15 button
Press:
Use this to play/pause tracks.
[SHIFT] + press:
The track returns to the temporary cue point and playback continues from there. (Stutter)
9. HOT CUE mode button
Press:
Sets the hot cue mode.
[SHIFT] + press:
This will be used with future function enhancements of the Serato DJ software.
10. ROLL mode button
Press:
Sets the roll mode.
[SHIFT] + press:
This will be used with future function enhancements of the Serato DJ software.
11. SLICER mode button
Press:
Sets the slicer mode.
- The mode switches between slicer mode 1 and slicer mode 2 each time the button is pressed.
- To cancel the slicer mode, press one of the [ROLL] mode, [SAMPLER] mode or [HOT CUE] mode buttons.
[SHIFT] + press:
This will be used with future function enhancements of the Serato DJ software.
12. SAMPLER mode button
Press:
Sets the sampler mode.
Press for over 1 second:
Turns the sampler velocity mode on and off.
- Using the sampler velocity mode (p.25)
[SHIFT] + press:
This will be used with future function enhancements of the Serato DJ software.
13. Performance pads
Various performances can be achieved using the pads.
Using the performance pads
14. PARAMETERc button, PARAMETERd button
These set the various parameters for when using the performance pads.
Using the performance pads
15. Beat indicator
This indicates the beats whose function is operated in the Pad Plus mode, the auto loop beats, etc. The "+" indicator lights when the Pad Plus mode is on.
Reading the beat indicator (p.12)
16. 1/2X (IN) button
Press:
Select the auto loop beat.
During loop playback, the length of loop playback is split in half each time this button is pressed.
[SHIFT] + press:
Loop In Point is set.
17. 2X (OUT) button
Press:
Select the auto loop beat.
During loop playback, the length of loop playback is doubled each time this button is pressed.
[SHIFT] + press:
The loop out point is set, and loop playback begins.
18. AUTO LOOP button
Press:
Turns the auto looping mode on and off.
During loop playback, this operation cancels looping.
[SHIFT] + press:
Switches looping between active and non-active. (Loop Active)
- Even if looping is active, if there is no playback position in that loop, loop playback is not performed.
- When the playback position enters the active loop, loop playback starts.
- During loop playback, this operation cancels looping.
19. PAD PLUS ON button
Press:
Turns the Pad Plus mode on or off.
Using the Pad Plus mode (p.23)
20. PAD PLUS TAP button
Press:
The beats for which the various functions of the Pad Plus mode operate can be set manually.
When tapped three or more times, the beat is calculated from the interval at which the button was tapped and that beat is set.
Switching the Pad Plus mode's tempo mode (p.25)
[SHIFT] + press:
Turns on the Pad Plus mode's hold function.
Using the hold function (p.25)
21. KEY LOCK button
Press:
Turns the key lock function on and off.
When the key lock function is on, the key does not change even when the playing speed is changed with the [TEMPO] slider.
- The sound is digitally processed, so the sound quality decreases.
[SHIFT] + press:
The [TEMPO] slider's range of variation switches each time the button is pressed.
Press for over 1 second:
Sets the tempo (BPM) of the currently playing track back to its original tempo.
22. SLIP button
Turns the slip mode on and off.
= Using the slip mode (p.19)
23. TEMPO slider
Use this to adjust the track playing speed. |